
前回

の続き。
今回は座標上の図形を描画したサンプルを貼っていく。
広告
サンプル1:2次元座標上の図形
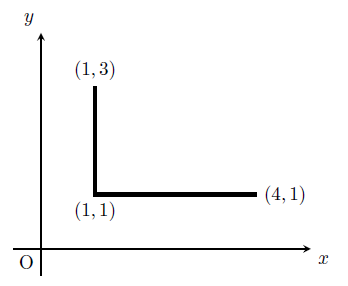
\begin{figure}[h]
\centering
\begin{tikzpicture}

\draw [-stealth](-0.5,0)--(5,0) node [below right]{$x$};
\draw [-stealth](0,-0.5)--(0,4) node [above left]{$y$};
\draw (0,0) node[below left]{O};

\draw [line width=2pt](1,3)--(1,1)--(4,1);
\draw (1,3) node[above]{$(1,3)$};
\draw (4,1) node[right]{$(4,1)$};
\draw (1,1) node[below]{$(1,1)$};

\end{tikzpicture}
\end{figure}
\begin{figure}[h]
\centering
\begin{tikzpicture}

\draw [-stealth](-0.5,0)--(5,0) node [below right]{$x$};
\draw [-stealth](0,-0.5)--(0,4) node [above left]{$y$};
\draw (0,0) node[below left]{O};

\fill[black! 20](0,0) rectangle(2,3);
\fill[black! 10](2,3)--(4,1.5)--(2,0)--cycle;
\draw (0,3)--(2,3)--(4,1.5)--(2,0)--(0,0)--cycle;
\draw (2,3)--(2,0);

\draw (2,0.1)--(2,-0.1);
\draw (2,-0.1) node[below]{$3$};
\draw (-0.1,3)--(0.1,3);
\draw (-0.1,3) node[left]{$4$};
\draw (4,1.5) node[right]{$(6,2)$};

\end{tikzpicture}
\end{figure}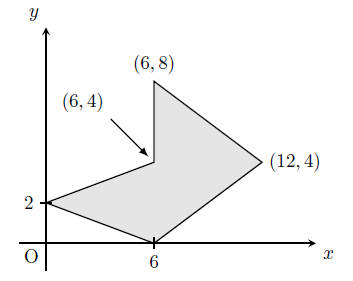
\begin{figure}[h]
\centering
\begin{tikzpicture}

\draw [-stealth](-0.5,0)--(5,0) node [below right]{$x$};
\draw [-stealth](0,-0.5)--(0,4) node [above left]{$y$};
\draw (0,0) node[below left]{O};

\fill[black! 10](2,3)--(4,1.5)--(2,0)--(0,0.75)--(2,1.5)--cycle;
\draw (2,3)--(4,1.5)--(2,0)--(0,0.75)--(2,1.5)--cycle;

\draw (2,0.1)--(2,-0.1);
\draw (2,-0.1) node[below]{$6$};
\draw (-0.1,0.75)--(0.1,0.75);
\draw (-0.1,0.75) node[left]{$2$};
\draw [-latex](1.2,2.3)--(1.9,1.6);
\draw (1.2,2.3) node[above left]{$(6,4)$};
\draw (2,3) node[above]{$(6,8)$};
\draw (4,1.5) node[right]{$(12,4)$};

\end{tikzpicture}
\end{figure}
\begin{figure}[h]
\centering
\begin{tikzpicture}

\fill[black! 10](0,0) circle(2);
\draw (0,0) circle(2);

\fill[white](1,0) circle(1);
\draw (1,0) circle(1);

\draw [latex-latex](0,0)--(2*cos{135},2*sin{135});
\draw (cos{135},sin{135}) node[above right]{$2$};

\draw [latex-latex](1,0)--(1+cos{45},sin{45});
\draw (1+cos{45}/2,sin{45}/2) node[above left]{$1$};

\draw (1,0.1)--(1,-0.1);
\draw (1,-0.1) node[below]{$1$};

\draw [-stealth](-2.5,0)--(2.5,0) node [below right]{$x$};
\draw [-stealth](0,-2.5)--(0,2.5) node [above left]{$y$};
\draw (0,0) node[below left]{O};

\end{tikzpicture}
サンプル2:量子力学の一次元ポテンシャル
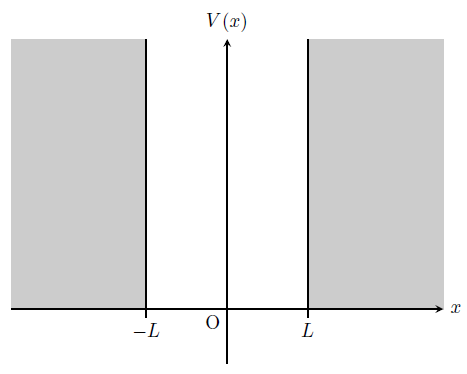
\begin{figure}[h]
\centering
\begin{tikzpicture}

\fill[black! 20](-4,0) rectangle(-1.5,5);
\draw (-1.5,0)--(-1.5,5);

\fill[black! 20](1.5,0) rectangle(4,5);
\draw (1.5,0)--(1.5,5);

\draw (1.5,-0.15)--(1.5,0.15);
\draw (1.5,-0.15) node [below]{$L$};

\draw (-1.5,-0.15)--(-1.5,0.15);
\draw (-1.5,-0.15) node [below]{$-L$};

\draw [-stealth](-4,0)--(4,0) node [right]{$x$};
\draw [-stealth](0,-1)--(0,5) node [above]{$V(x)$};
\draw (0,0) node[below left]{O};

\end{tikzpicture}
\end{figure}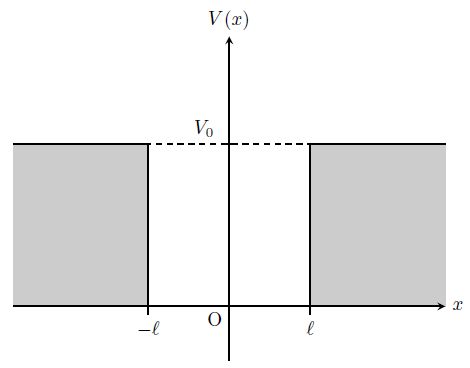
\begin{figure}[h]
\centering
\begin{tikzpicture}

\fill[black! 20](-4,0) rectangle(-1.5,3);
\draw (-1.5,0)--(-1.5,3);
\draw (-4,3)--(-1.5,3);

\fill[black! 20](1.5,0) rectangle(4,3);
\draw (1.5,0)--(1.5,3);
\draw (4,3)--(1.5,3);

\draw [dashed](-1.55,3)--(1.55,3);
\draw (-0.15,3)--(0.15,3);
\draw (-0.15,3) node [above left]{$V_{0}$};

\draw (1.5,-0.15)--(1.5,0.15);
\draw (1.5,-0.15) node [below]{$\ell$};

\draw (-1.5,-0.15)--(-1.5,0.15);
\draw (-1.5,-0.15) node [below]{$-\ell$};

\draw [-stealth](-4,0)--(4,0) node [right]{$x$};
\draw [-stealth](0,-1)--(0,5) node [above]{$V(x)$};
\draw (0,0) node[below left]{O};

\end{tikzpicture}
\end{figure}
サンプル3:振動の分割

\begin{figure}[h]
\centering
\begin{tikzpicture}

\draw[-stealth](-2,0,0) -- (2,0,0) node[right]{x};
\draw[-stealth](0,-2,0) -- (0,2,0) node[above]{y};

\draw[latex-latex, line width=2pt, black!20!green](0,-1.5,0)--(0,1.5,0) node[right]{$\bm{B}(t)$};

\draw(0,0,0)circle(0.17);
\fill[black](0,0,0)circle(0.1);
\draw(0,-0.1,0)node[below left]{z};

\draw (3.2,0,0)node{\huge$\bm{=}$};

\draw[-stealth](4,0,0) -- (8,0,0) node[right]{x};
\draw[-stealth](6,-2,0) -- (6,2,0) node[above]{y};

\draw(6,0,0)circle(1);

\draw[-latex, line width=2pt, black!20!green](6,0,0)--(6-0.7,0.7,0);
\draw[black!20!green](6-0.5,1,0)node[left]{$\bm{B}_{\omega}(t)$};

\draw[-latex, line width=1pt](6-0.842,0.707,0)to[out=230,in=85](6-1.096,0.096,0);
\draw(6-1.096,0.3,0)node[left]{$\omega$};

\draw(6,0,0)circle(0.17);
\fill[black](6,0,0)circle(0.1);
\draw(6,-0.1,0)node[below left]{z};

\draw (9.2,0,0)node{\huge$\bm{+}$};

\draw[-stealth](10,0,0) -- (14,0,0) node[right]{x};
\draw[-stealth](12,-2,0) -- (12,2,0) node[above]{y};

\draw(12,0,0)circle(1);

\draw[-latex, line width=2pt, black!20!green](12,0,0)--(12+0.7,0.7,0);
\draw[black!20!green](12+0.5,1,0)node[right]{$\bm{B}_{-\omega}(t)$};

\draw[-latex, line width=1pt](12+0.842,0.707,0)to[out=310,in=95](12+1.096,0.096,0);
\draw(12+1.096,0.3,0) node[right]{$-\omega$};

\draw(12,0,0)circle(0.17);
\fill[black](12,0,0)circle(0.1);
\draw(12,-0.1,0)node[below left]{z};

\end{tikzpicture}
\end{figure}
サンプル4:3次元座標上の図形
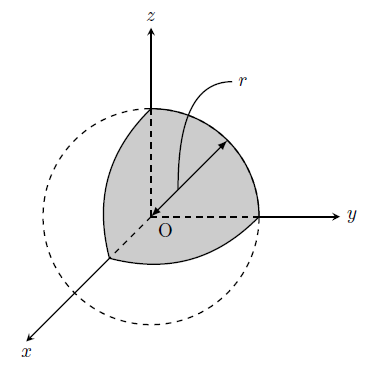
\begin{figure}[h]
\centering
\begin{tikzpicture}

\fill[black!20](0,2,0) to[out=0,in=90] (2,0,0) to[bend left] (0,0,2) to[bend left] (0,2,0);
\draw(0,2,0) to[out=0,in=90] (2,0,0) to[bend left] (0,0,2) to[bend left] (0,2,0);

\draw [dashed](0,0,0) circle (2);

\draw[latex-latex](0,0,0)--({sqrt(2)}, {sqrt(2)} ,0);
\draw(1.5,2.5,0) to[out=180,in=90] (0.5,0.5,0);
\draw(1.7,2.5,0) node{$r$};

\draw[dashed](0,0,0) -- (2,0,0);
\draw[-stealth](2,0,0) -- (3.5,0,0) node[right]{$y$};

\draw[dashed](0,0,0) -- (0,2,0);
\draw[-stealth](0,2,0) -- (0,3.5,0) node[above]{$z$};

\draw[dashed](0,0,0) -- (0,0,2);
\draw[-stealth](0,0,2) -- (0,0,6) node[below]{$x$};

\draw (0,0,0) node[below right]{O};

\end{tikzpicture}
\end{figure}
\begin{figure}[h]
\centering
\begin{tikzpicture}

\fill[black!20](0,2.5,0)--(2.5,0,0)--(0,0,2.5)--(0,2.5,0);
\draw(0,2.5,0)--(2.5,0,0)--(0,0,2.5)--(0,2.5,0);

\draw[dashed](0,0,0) -- (2.5,0,0);
\draw(2.5,0,0) node[below]{$a$};
\draw[-stealth](2.5,0,0) -- (3.5,0,0) node[right]{$y$};

\draw[dashed](0,0,0) -- (0,2.5,0);
\draw(0,2.8,0) node[right]{$a$};
\draw[-stealth](0,2.5,0) -- (0,3.5,0) node[above]{$z$};

\draw[dashed](0,0,0) -- (0,0,2.5);
\draw(0,0.3,2.5) node[left]{$a$};
\draw[-stealth](0,0,2.5) -- (0,0,6) node[below]{$x$};

\draw (0,0,0) node[below right]{O};

\end{tikzpicture}
\end{figure}
サンプル5:3次元座標上の円

\begin{figure}[h]
\centering
\begin{tikzpicture}

\draw[-stealth](2.5,0,0)--(-2.5,0,0) node[left]{x};
\draw[-stealth](0,0,-3) -- (0,0,3) node[below]{y};
\draw[-stealth](0,-3,0) -- (0,3.5,0) node[above]{z};

\draw(0,0,0)rectangle(0.3,0.3);

\draw[-latex, line width=2pt, black!20!green](0,0,0)--(0,3,0) node[left]{$\bm{B}$};

\draw[-latex, line width=2pt, red](0,0,0)--(2,0,0) node[below,red]{$A$};

\draw(0,0,0) ellipse (2 and 0.57);
\draw[-latex,line width=1pt](1,0.49,0)--(0.8,0.54,0);
\draw[-latex,line width=1pt](-1,-0.49,0)--(-0.8,-0.54,0);

\end{tikzpicture}
\end{figure}
広告
終わりに
座標上の図形編はここで終了。
次は、これまで記事に掲載してきた図のコードを紹介しようと思う。
広告
コメント